Loading...

Your privacy choices

Google Analytics 4 measures site visits and Google Ads measures advertising clicks and checkout completions, only for the purposes you accept. Neither is required to buy. Necessary checkout services remain available.

Your privacy choices

Google Analytics 4 measures site visits and Google Ads measures advertising clicks and checkout completions, only for the purposes you accept. Neither is required to buy. Necessary checkout services remain available.

These optional Google services may set audience or advertising cookies after your acceptance. Analytics and advertising are separate choices. Acceptance and refusal are remembered in this browser for a fixed 180 days, without extending the period when read. You can withdraw or change your choices at any time using Privacy choices in the footer. Withdrawal removes optional first-party Google cookies and reloads the page if Google has already loaded (using session storage in this tab if persistent storage refuses the withdrawal; a blank page opens only if both stores cannot safely record the withdrawal and a stale approval remains). Checkout, external demos, videos, support and newsletter services have their own privacy information.

Step-by-step Stripe guide

WordPress Quote Forms with Stripe Payments: Setup Guide

Build and review the quote first, connect Stripe using test credentials, then verify the amount and the payment result. This guide covers Stripe inside the WordPress form, not the Freemius checkout used to buy the plugin.

Bottom line

A visible total or thank-you page does not confirm a payment. Check Stripe’s payment status and the plugin’s corresponding paid record before treating a quote as paid.

Updated 2026-10-0511 min read
Stripe payment modal opened from a WordPress quote form
The finished guide example shows the WordPress quote form frontend.

What this guide covers

  • The existing screenshots illustrate a website quote and deposit. Settings and confirmation were checked against a WP Cost Estimation 10.6.4 code snapshot on 5 October 2026; a fresh WordPress/Stripe test was not performed. Check labels against your installed version. This historical code snapshot does not establish the behaviour of the currently distributed version. These are retained illustrations, not new payment-test captures.
  • Create a website project quote form with the AI wizard.
  • Embed the form with fullscreen="true" for a focused buyer experience.

Before you start

  • A separate authorised WordPress test site with WP Cost Estimation installed; do not test by editing a live customer form.
  • Stripe test credentials for the same account and test environment, with access to inspect the resulting test payments.
  • A reviewed quote formula, currency, deposit rule and customer follow-up. AI generation is optional; provider setup and usage costs are separate.

Step 1

Generate the first quote form with the AI wizard

The AI wizard is optional. You can create the same steps manually and review the pricing before connecting Stripe.

Start in the plugin forms screen and open the AI wizard. Describe the business model, the packages, the fields you need, and the payment intent. For this example, the prompt asks for a website project quote form that sells online website packages.

The goal is not to publish the AI result blindly. Use it to get a structured first draft faster: package selection, optional services, contact fields, a final summary, and a payment step.

  • Name the service clearly, for example website project quote or web design package.
  • Ask for a multi-step flow so pricing feels guided instead of crowded.
  • Mention that Stripe should be used for a deposit, not for collecting card data in custom fields.
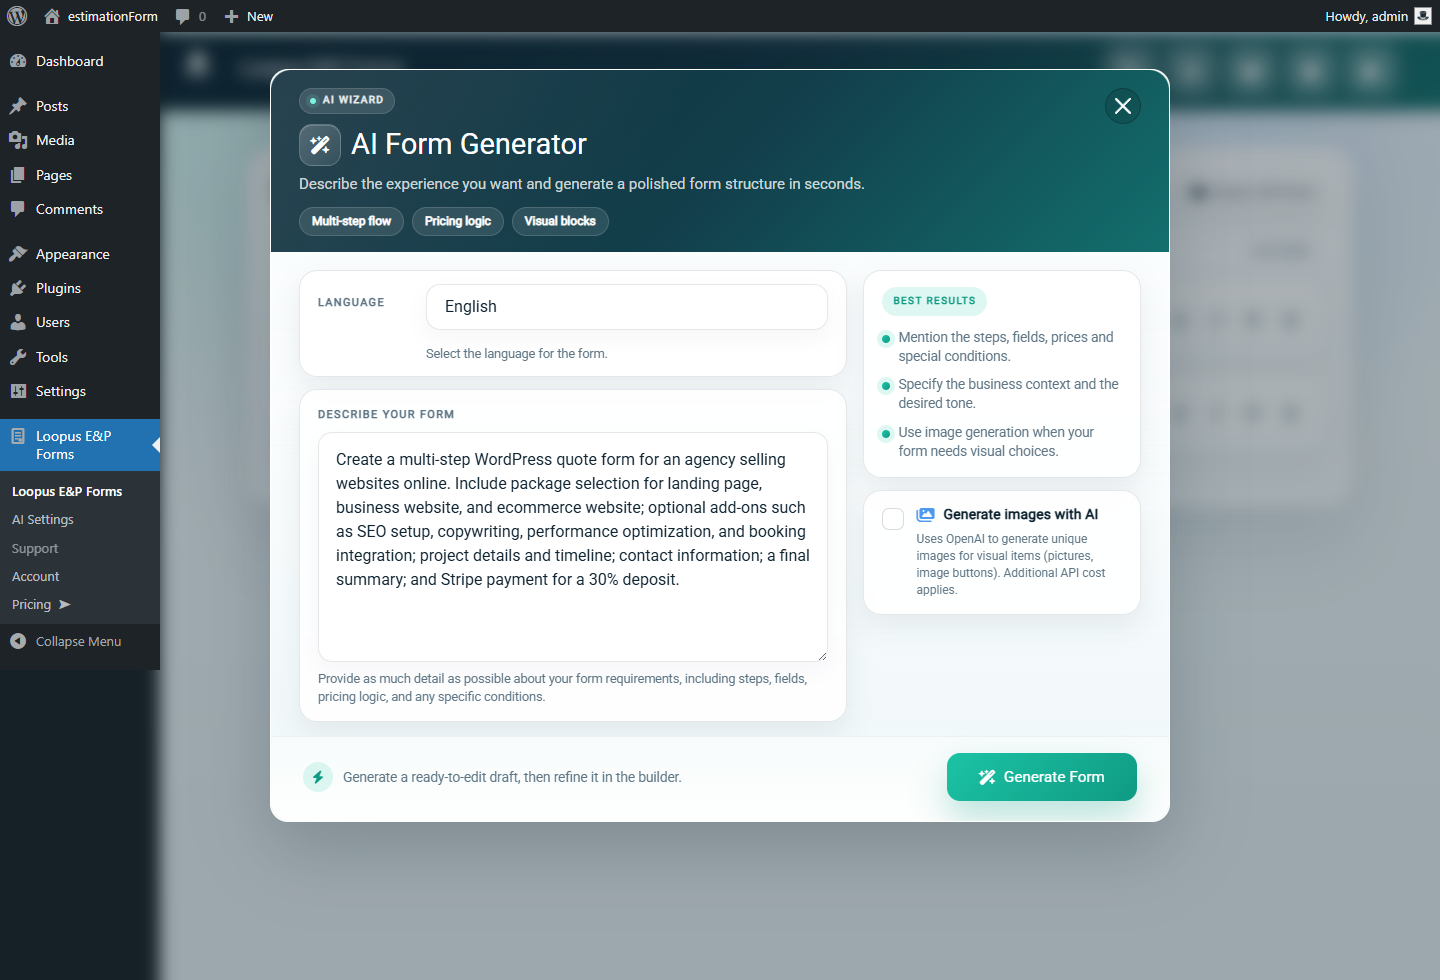
AI wizard prompt for creating a WordPress quote form with Stripe payments
The AI wizard prompt defines the quote form structure before the form is generated.

Step 2

Review the generated form structure

After generation, review the builder before touching payment settings. The first pass should already contain the main steps of the buyer journey: package choice, project details, options, contact details, and checkout.

Rename labels, remove unnecessary questions and make the form describe one clear offer. Review what the visitor is reserving or paying for.

  • Keep the first step simple: one primary service or package choice.
  • Move optional add-ons after the base package.
  • Place the payment step after the visitor has seen the calculated total.
Generated quote form opened in the WordPress form builder
The generated form appears in the builder with its initial steps and fields ready to edit.

Step 3

Confirm the form is saved and easy to find

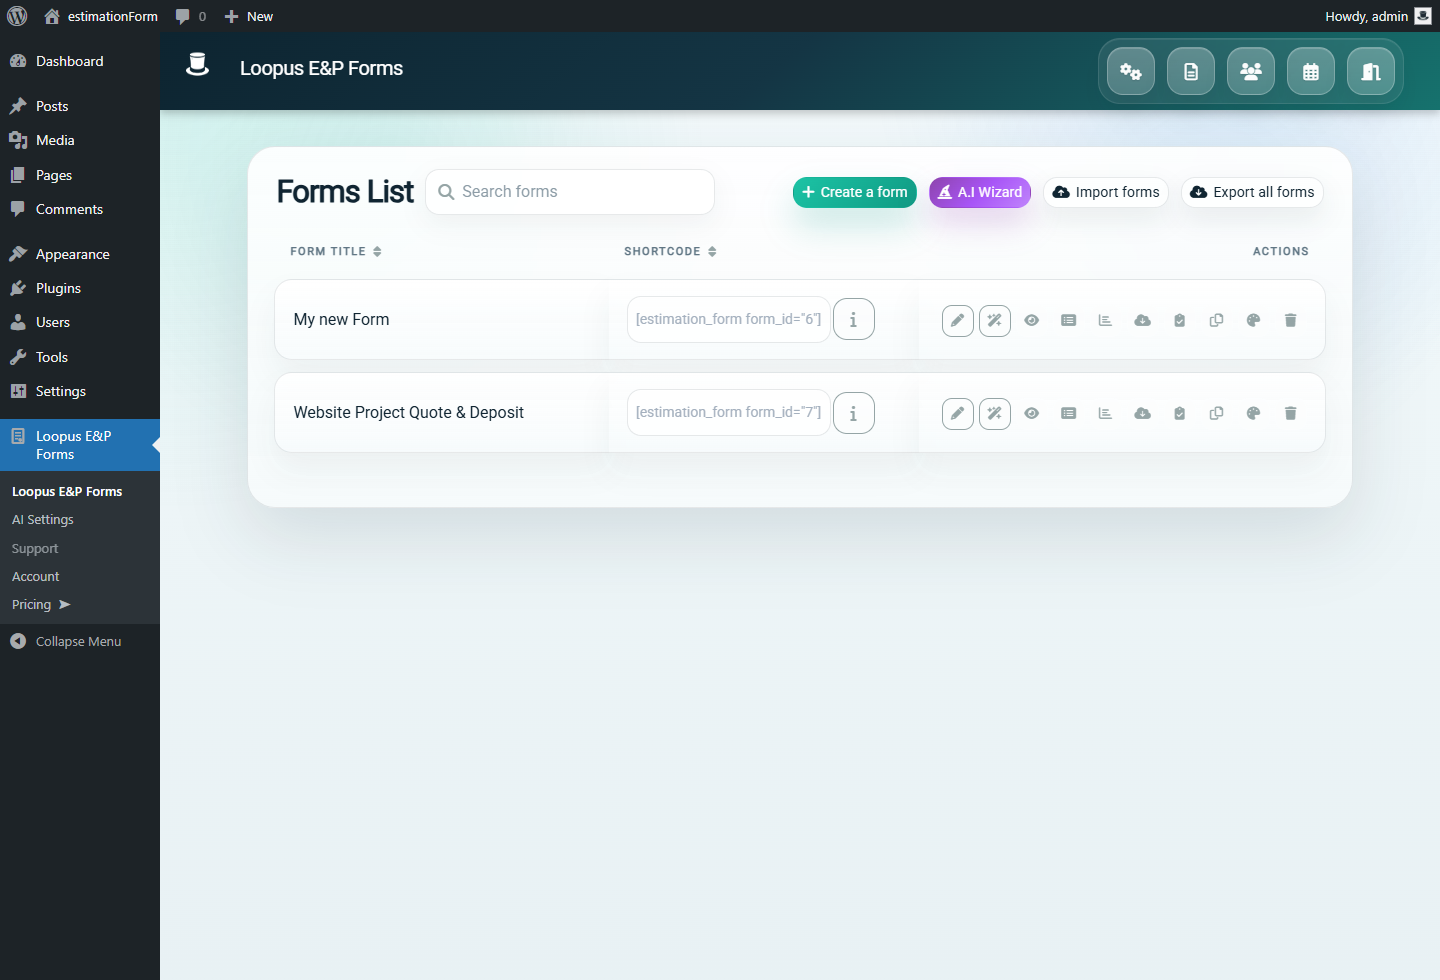
Return to the forms list and confirm that the new form is saved with a recognizable name. This matters when the site has multiple quote forms, demos, or client-specific calculators.

For the article example, the form is named Website Project Quote & Deposit so the payment purpose remains clear in the admin.

  • Use a descriptive form name.
  • Keep one test form separate from production forms.
  • Open the form from the list before configuring payment settings.
WordPress admin forms list showing the quote form
A clear form name makes the Stripe-enabled quote form easier to manage later.

Step 4

Check the steps before adding payment

Open the builder again and confirm the customer journey is logical. A good quote-to-payment form should not ask for payment before the visitor understands the offer and total.

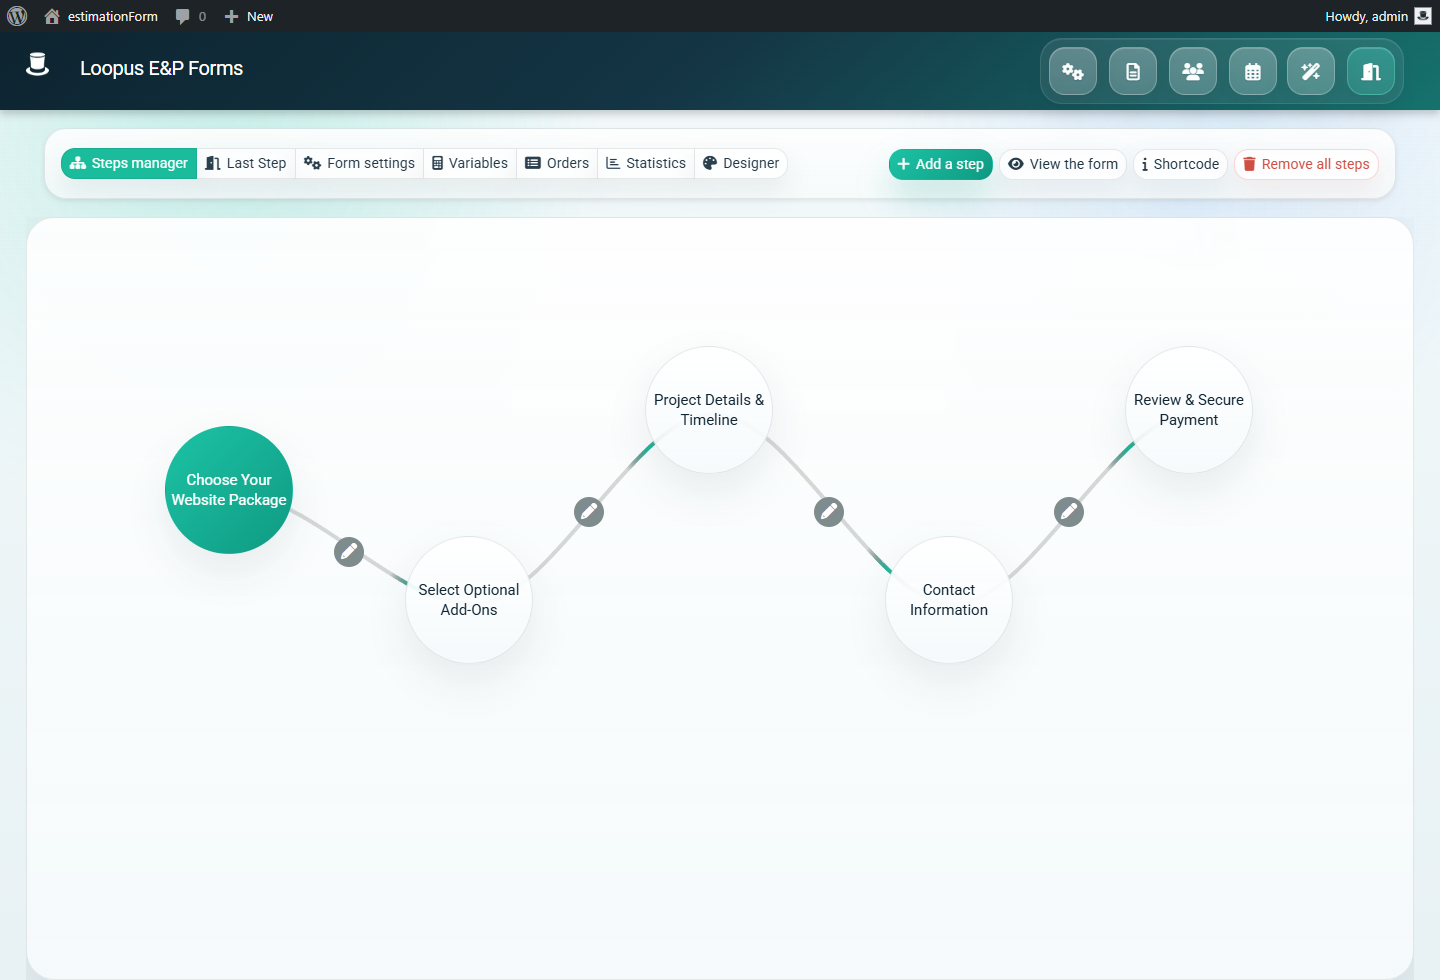
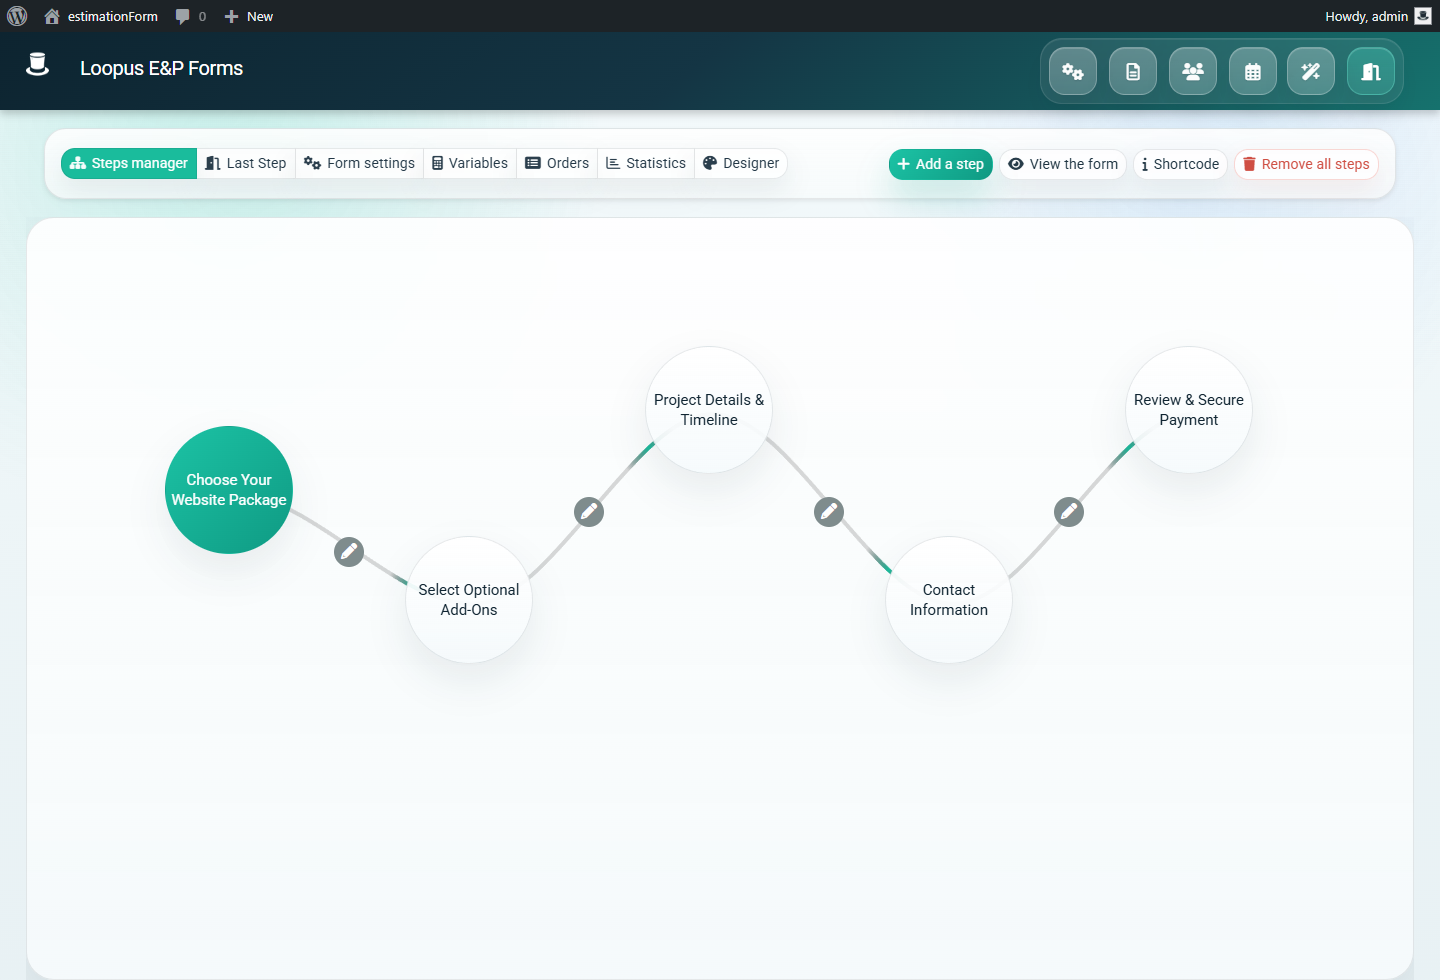
In this example, package and option choices come first, then the payment method step appears after the quote total is calculated, and the final summary appears before the Stripe modal opens.

  • Put pricing decisions before contact and payment fields.
  • Keep the final summary visible before payment.
  • Remove duplicate fields that would slow the buyer down.
WordPress quote form builder showing the form steps
The backend step list should match the order the customer will experience on the frontend.

Step 5

Connect matching Stripe test keys and choose the amount

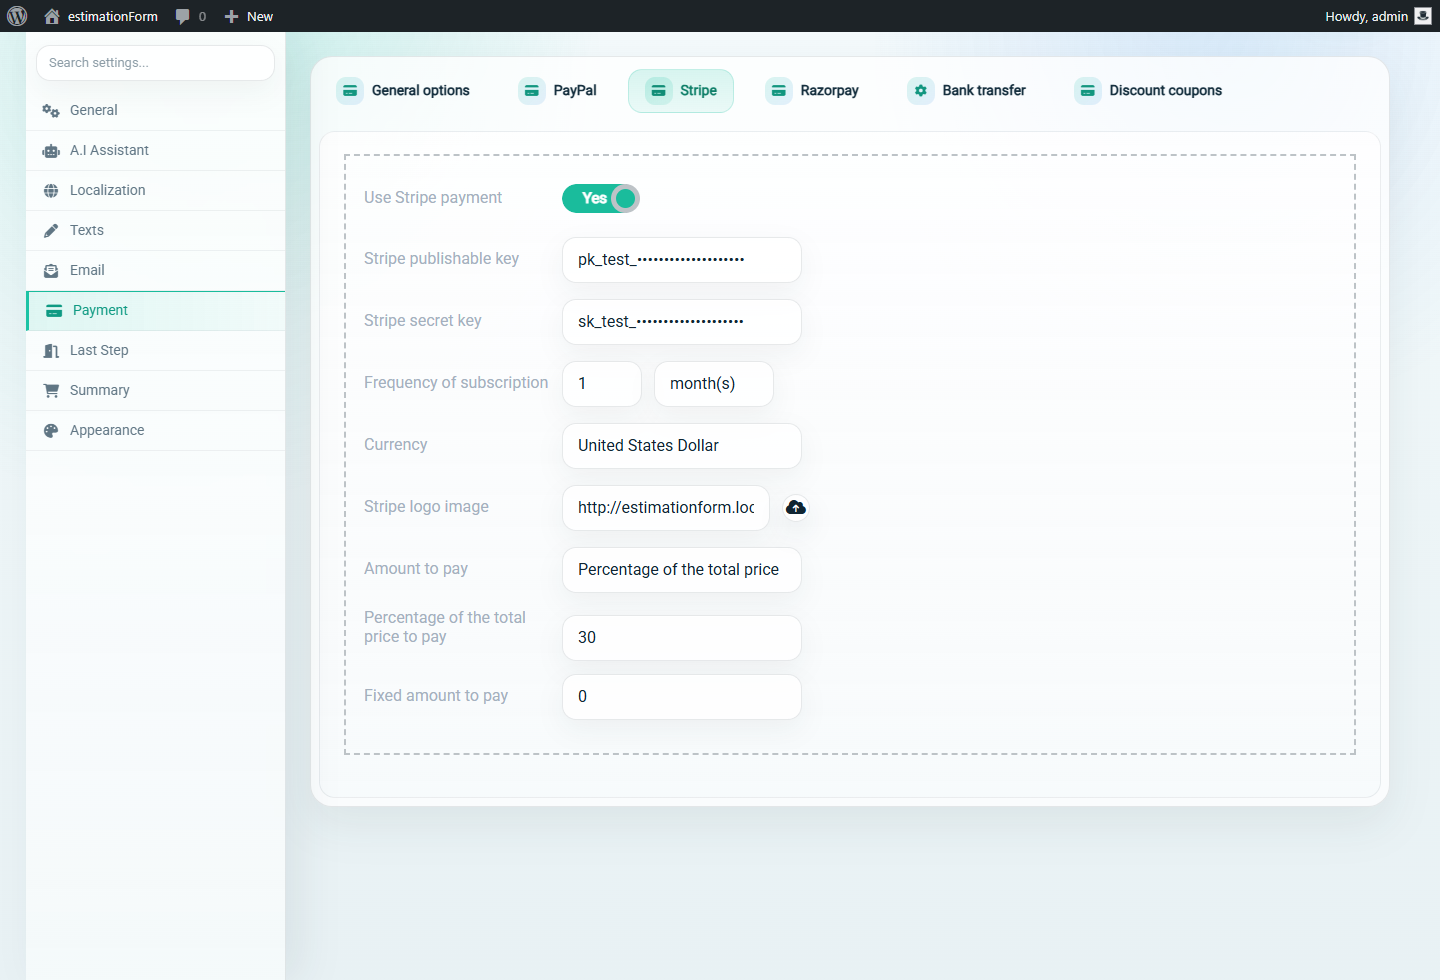
In the inspected settings, the Payment section contains Stripe controls including Use Stripe payment, Stripe publishable key, Stripe secret key, Currency and Amount to pay. Enter the matched publishable and secret TEST keys from your authorised Stripe test environment. Keep the secret key in the plugin’s server-side setting and out of screenshots or public fields.

The inspected Amount to pay selector offers Full amount, Percentage of the total price and Fixed amount. For the illustrated deposit, select Percentage of the total price and enter 30. Verify the resulting amount rather than relying on the quote display.

  • Use test credentials on the separate test form; a “sandbox” switch is not a substitute for matching test keys.
  • Use the same currency for the quote and Stripe setting.
  • For the illustration, 2,400 × 30 / 100 = 720 is the expected deposit before applicable adjustments, not an observed transaction. These are example service amounts, not plugin prices.
  • Use the form’s own ID when embedding; the shortcode below is an example.
Stripe settings configured in the WordPress quote form backend
Stripe is enabled in test mode with a percentage deposit rule.

Step 6

Embed the form fullscreen on a WordPress page

Create or edit the WordPress page that will host the quote form. For a focused quote funnel, embed the form in fullscreen mode so the buyer experience is not visually competing with the surrounding theme.

Use the form shortcode and add the fullscreen attribute.

[estimation_form form_id="7" fullscreen="true"]
  • Use the correct form ID from the form list.
  • Keep one dedicated URL for the Stripe quote form.
  • Test the page while logged out or in a private browser session.

Step 7

Test the first frontend package step

Open the public page and start as a normal visitor. The first screen should make the offer obvious and should not feel like a generic contact form.

For a website quote form, package names and prices should be visible before optional questions. That gives the visitor enough context to continue.

  • Confirm that the form loads correctly on the public URL.
  • Check that the total starts at the expected amount.
  • Make sure package copy is understandable without admin knowledge.
Frontend WordPress quote form package selection step
The first frontend step introduces the available website packages.

Step 8

Select a package and verify the live total

Choose a package and confirm that the live total updates immediately. This is the core advantage of a quote form over a normal contact form: the buyer sees the pricing consequence of each choice.

If the total does not match expectations, fix the form item prices before testing Stripe. Payment settings should be the last layer, not a workaround for incorrect quote logic.

  • Select a package.
  • Check the displayed total.
  • Review any add-ons or conditions that affect the price.
Selected package in a frontend WordPress quote form
Package selection should update the quote total before the visitor reaches payment.

Step 9

Reach the Stripe payment step

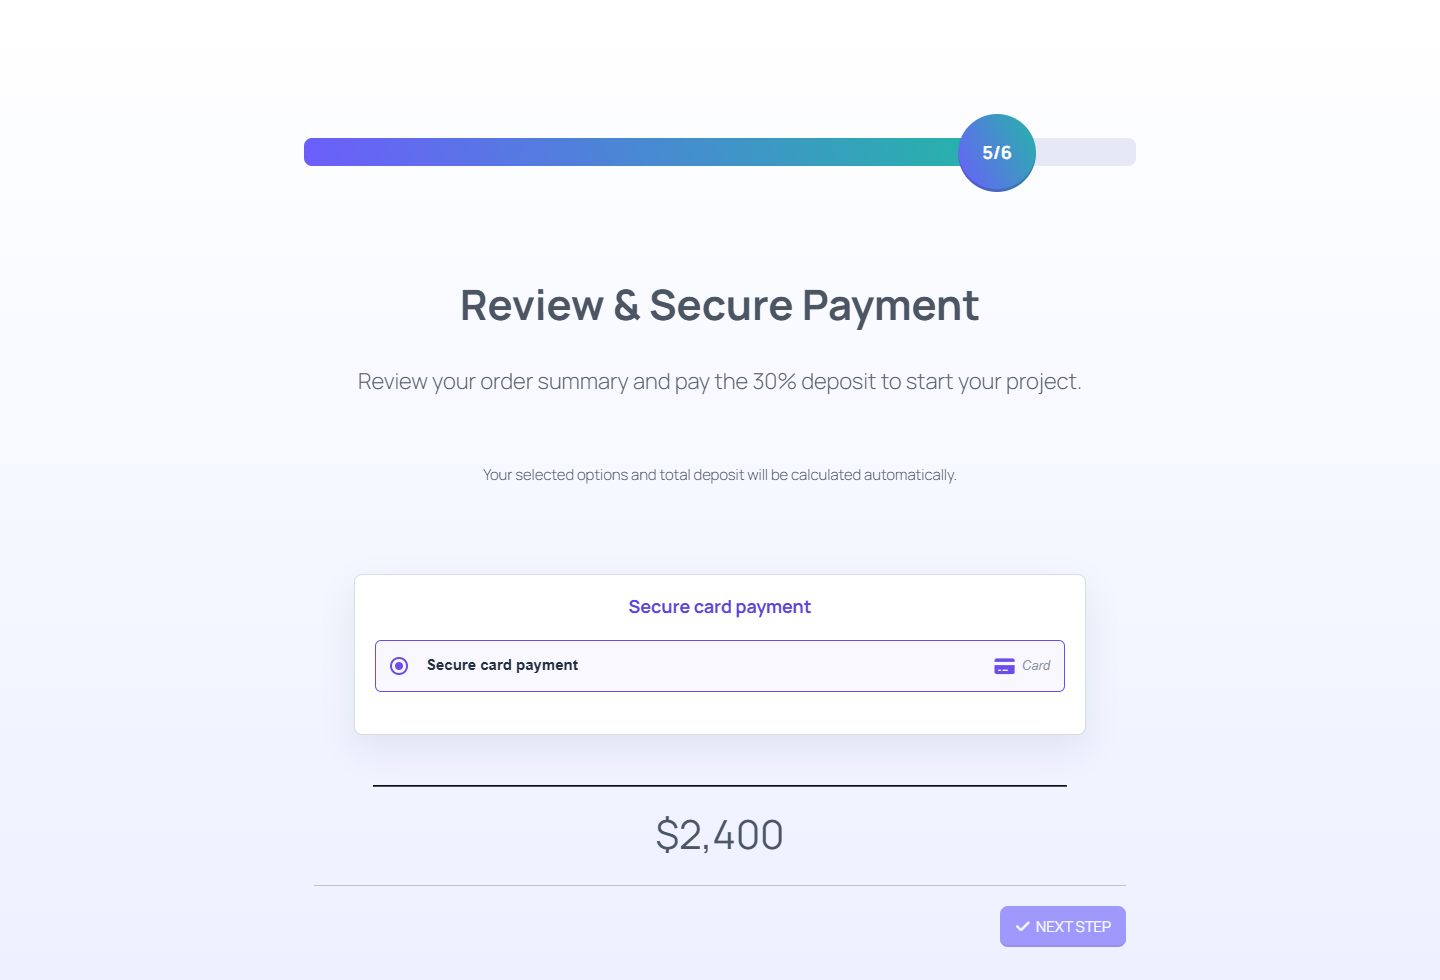
Continue to the payment method step and confirm that the secure card payment option appears after the quote is calculated. In this example, the form still displays the full quote total of $2,400 on the step.

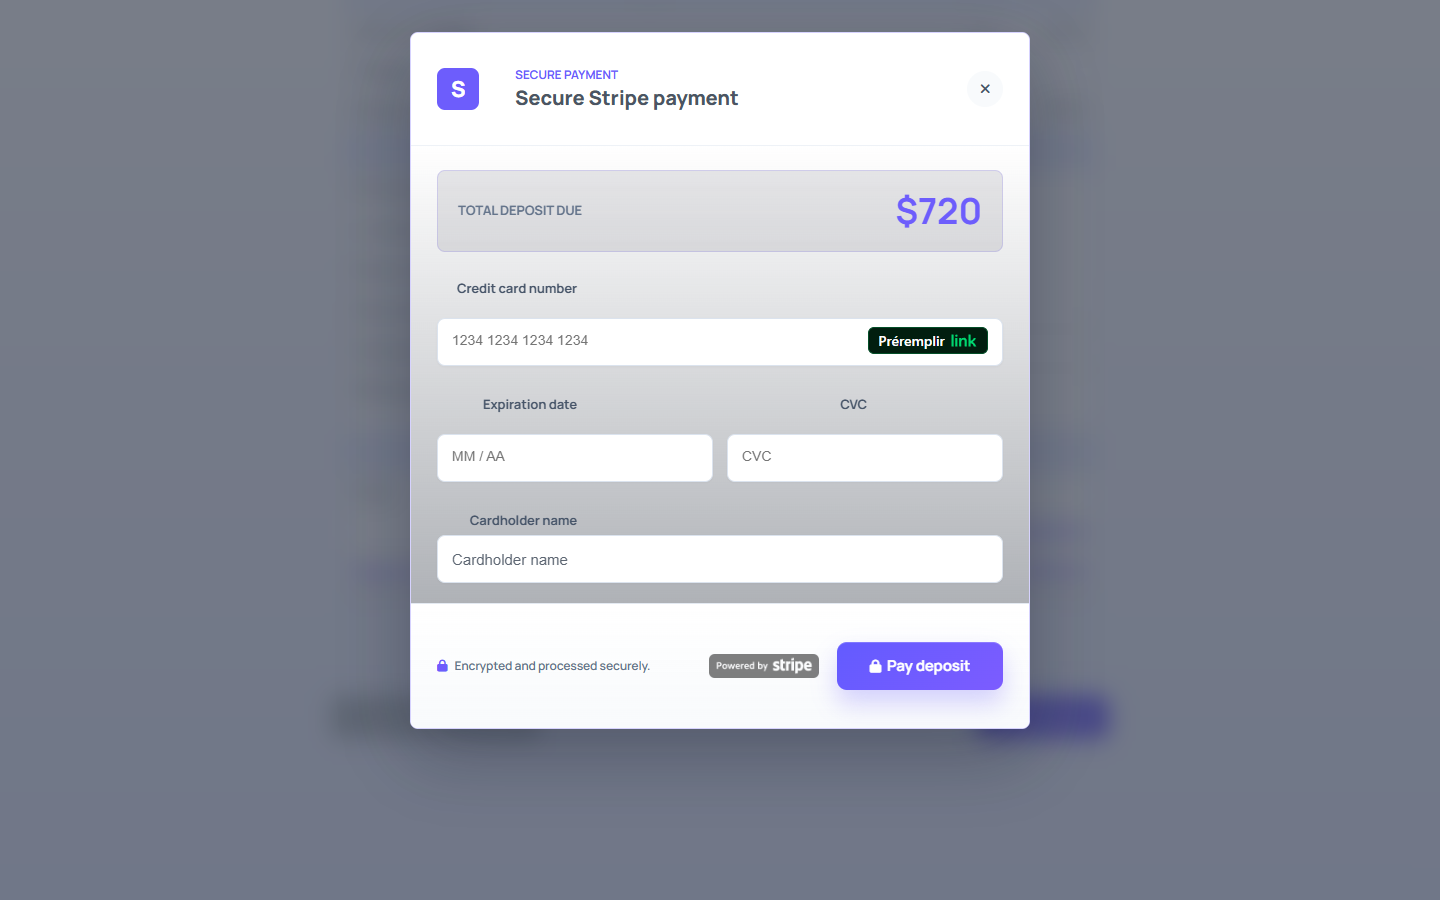
The 30% rule is applied when the Stripe modal opens, where the deposit due is $720. That separation is important: the form total remains the quote total, while Stripe receives the configured Amount to pay.

  • Confirm the payment label is clear.
  • Check that the quote total is still correct before the final summary.
  • Open the modal later to verify the actual Stripe amount.
Stripe payment step inside a WordPress quote form
The payment method step keeps the calculated quote visible; the configured Stripe amount is checked in the payment modal.

Step 10

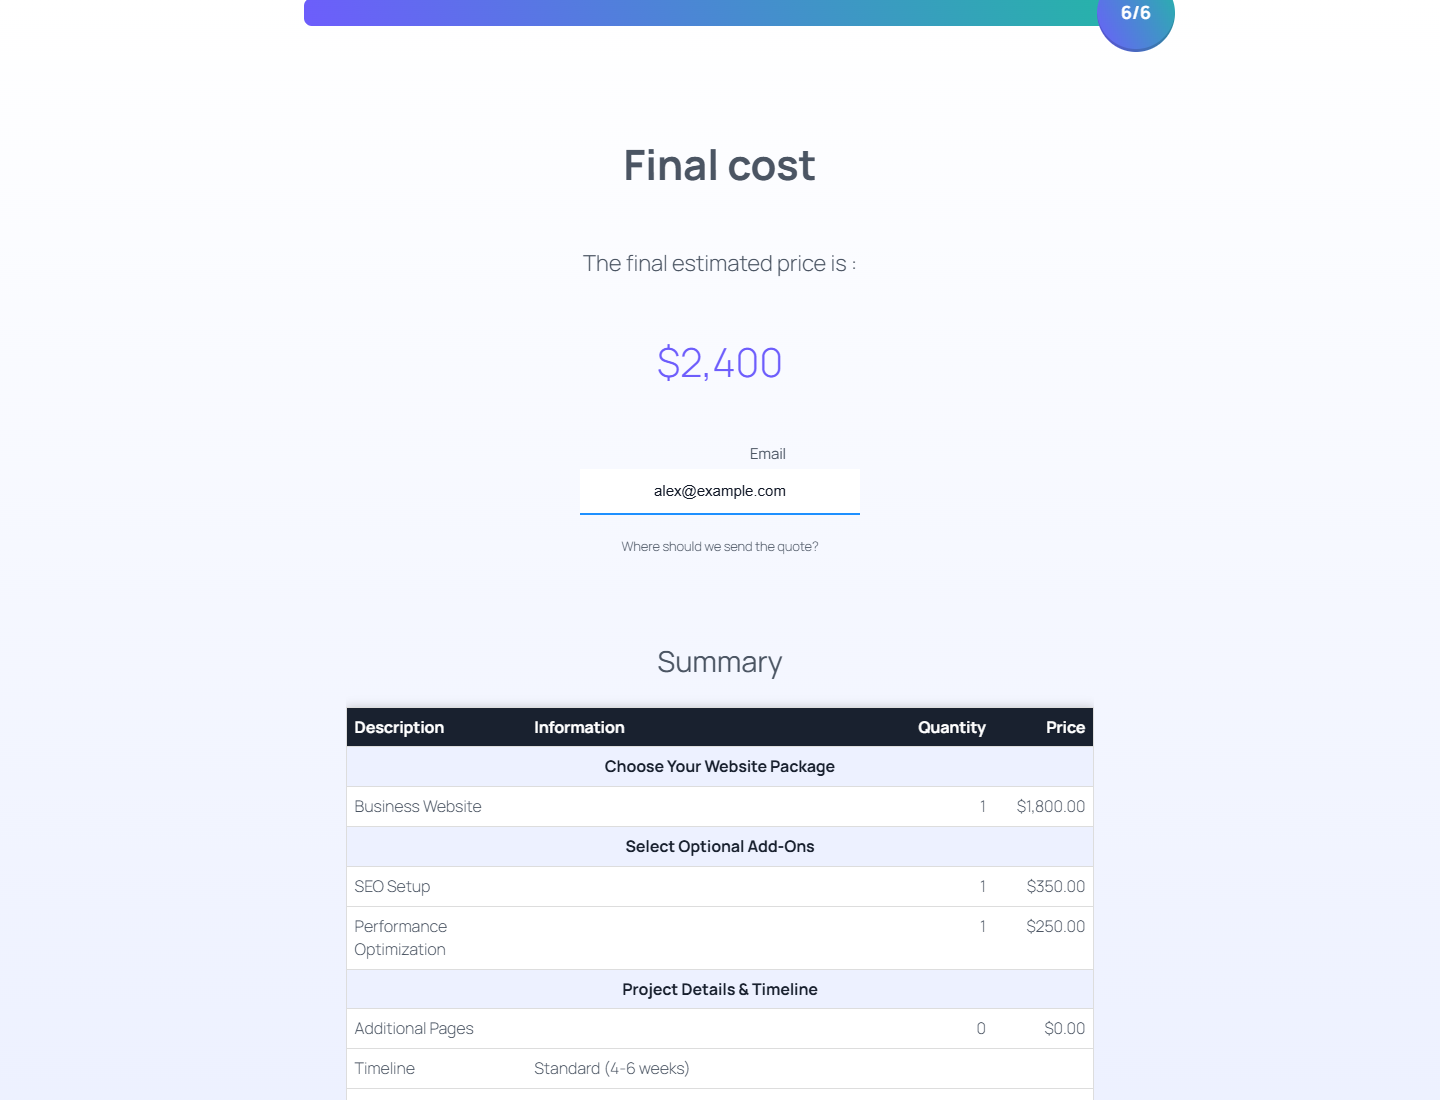
Review the final quote summary

Before opening the Stripe modal, review the final summary. A good summary helps the customer understand what they chose and gives the business a cleaner lead or order record.

Make sure required contact fields are filled and that the summary rows reflect the same choices and prices shown earlier in the form.

  • Check the customer email field.
  • Verify selected package and add-ons.
  • Confirm the final total.
  • Make sure the summary is readable on desktop and mobile.
Final quote summary before Stripe payment in WordPress
The final summary gives the buyer one last chance to review the calculated quote before payment.

Step 11

Check the modal and submit only an authorised test payment

The existing illustration shows a 720 deposit for a 2,400 quote. Confirm that your modal displays the expected amount and currency before submitting. Stripe Elements handles the card field in the inspected code; never add ordinary form fields to collect card details.

On your separate test site, use Stripe’s official test payment details only after confirming the account is in its test environment. Opening the modal is a UI check, not a successful payment. No payment was submitted for this article.

  • Compare quote, deposit calculation and the actual Stripe test payment amount.
  • Keep test and live credentials separate.
  • Do not use a real card to validate the guide.
Stripe card payment modal opened from a WordPress quote form
The Stripe modal confirms that card collection is handled by Stripe in the secure checkout flow.

Step 12

Verify a confirmed payment, not just a redirect

For the inspected card-payment path, the server retrieves the PaymentIntent and requires status succeeded before marking the corresponding plugin log paid with payment method Stripe. A failed verification returns a payment error. This is a code observation for 10.6.4, not proof of an executed payment or a webhook configuration.

For your test, inspect the Stripe test payment and the matching plugin order record. Compare amount, currency and reference, then check the intended confirmation message and notifications. A redirect, email or amount on screen is insufficient by itself.

  • Success: the Stripe test payment is succeeded and the matching plugin record is paid.
  • Decline or failed authentication: show an actionable error and verify that the matching record is not paid.
  • Cancel or close the modal before confirmation: return to the quote and verify that no paid record was created.
  • Reload or retry: review the payment references and look for duplicate payment attempts before accepting the flow.

Step 13

Diagnose amount or confirmation problems

If Stripe rejects the request, first check that both keys belong to the same account and test environment, that Stripe payment is enabled for this form and that the currency and payable amount are valid. Never paste a secret into a support screenshot.

If the amount is wrong, check item prices, optional selections and Amount to pay before retrying. If Stripe shows succeeded but the plugin remains unpaid, compare the PaymentIntent reference with the plugin record and inspect the verification error. Do not declare payment confirmed from the thank-you page.

  • Test required and empty fields before reaching payment.
  • Turn an option off and revisit the summary; the amount must reflect the current choices.
  • Record success, decline and cancellation outcomes in the test site before live activation.

Launch checklist

  • Review the installed version’s Stripe settings against this guide.
  • Verify quote amount, deposit amount, currency and current options in the test environment.
  • Complete authorised success, decline and cancellation tests and inspect both Stripe and plugin records.
  • Check mobile layout, required fields and intended notifications without exposing credentials.
  • Agree deposit, cancellation and refund wording; live activation is a separate step after the tests.
Guide FAQ

Frequently asked questions

Which payment system does this guide describe?

Stripe used inside WP Cost Estimation forms. Buying the plugin through Freemius is a separate checkout and does not test this payment flow.

Can the form collect a deposit?

The inspected 10.6.4 settings include full, percentage and fixed amounts. The 30% illustration means 720 from a 2,400 quote; verify the current installed version and its actual Stripe amount.

What confirms a payment?

In the inspected card-payment path, a retrieved PaymentIntent with status succeeded precedes the paid plugin record. Confirm both records in your authorised test environment; the modal or a redirect alone proves less.

Build the next quote flow

Use the demos and documentation to adapt the same pattern to booking deposits, consulting packages, product configuration, and client quote calculators.