Loading...
Step-by-step calculation guide

How to Create a WordPress Price Calculation Form

Build a WordPress price calculation form with the AI wizard, package pricing, square-foot formulas, add-ons, discounts, and a fullscreen frontend estimate.

Updated 2026-05-148 min read
Final summary of a WordPress price calculation form
The finished calculator shows a clean final estimate with the selected services, quantities, discount, and total.

What this guide covers

  • Generate a price calculation form with the AI wizard.
  • Enable Price calculation on the Property Size item for square-foot pricing.
  • Add package choices, quantities, add-ons, and a frequency discount.
  • Embed the form with fullscreen="true" and test the final estimate.

Before you start

  • A WordPress site with WP Cost Estimation & Payment Forms Builder installed.
  • A clear pricing model with base packages, variables, and optional extras.
  • A test page where you can embed and verify the calculator frontend.

Step 1

Generate the first calculator form with the AI wizard

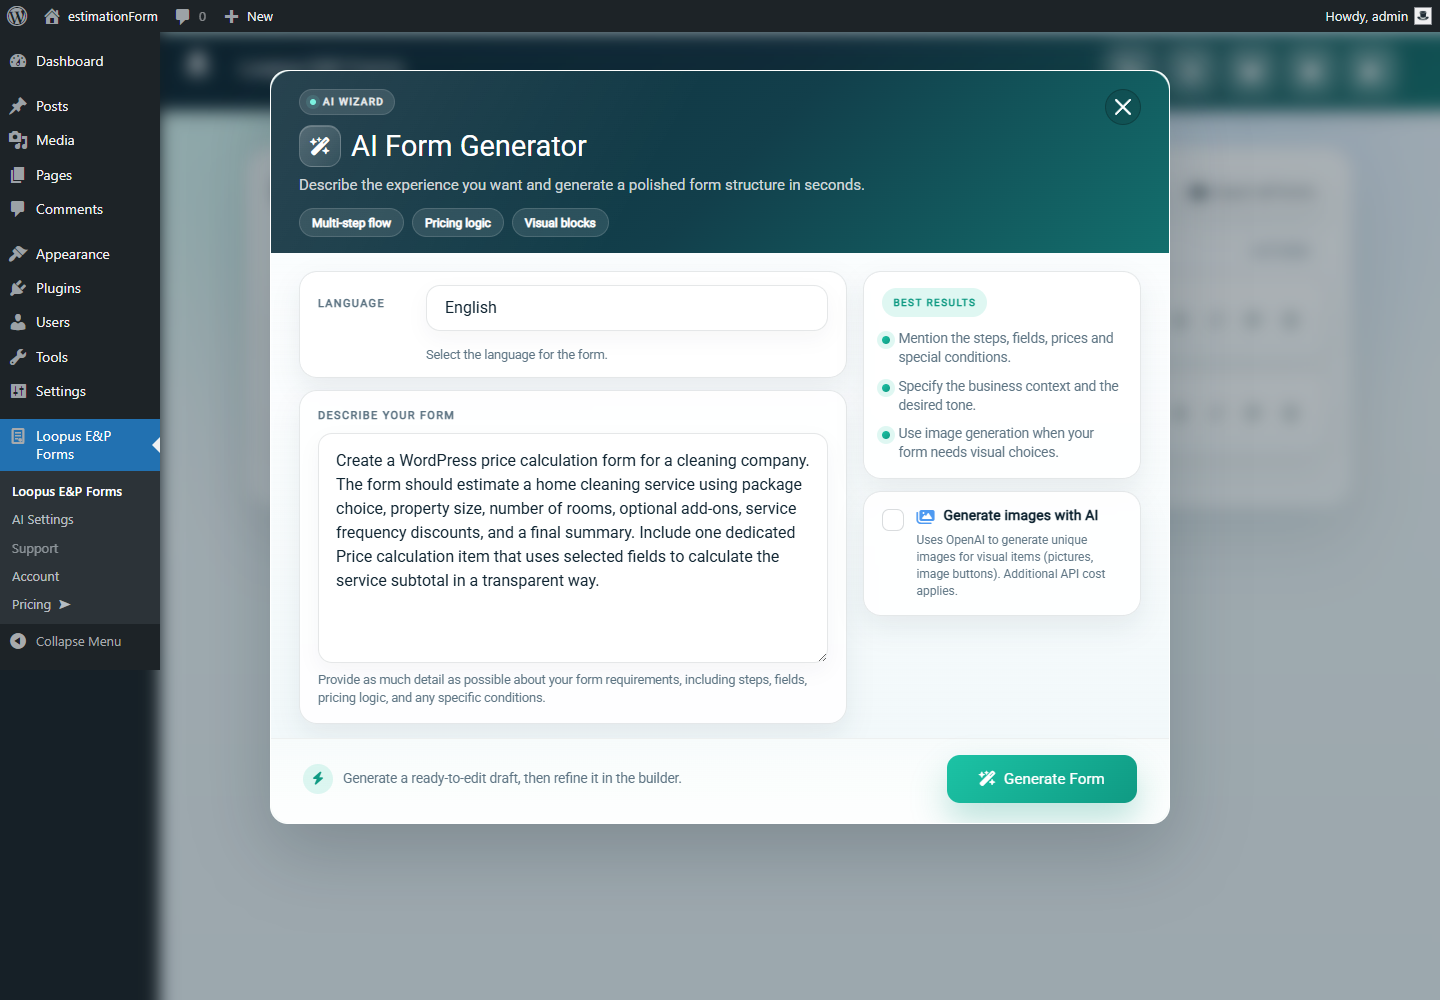
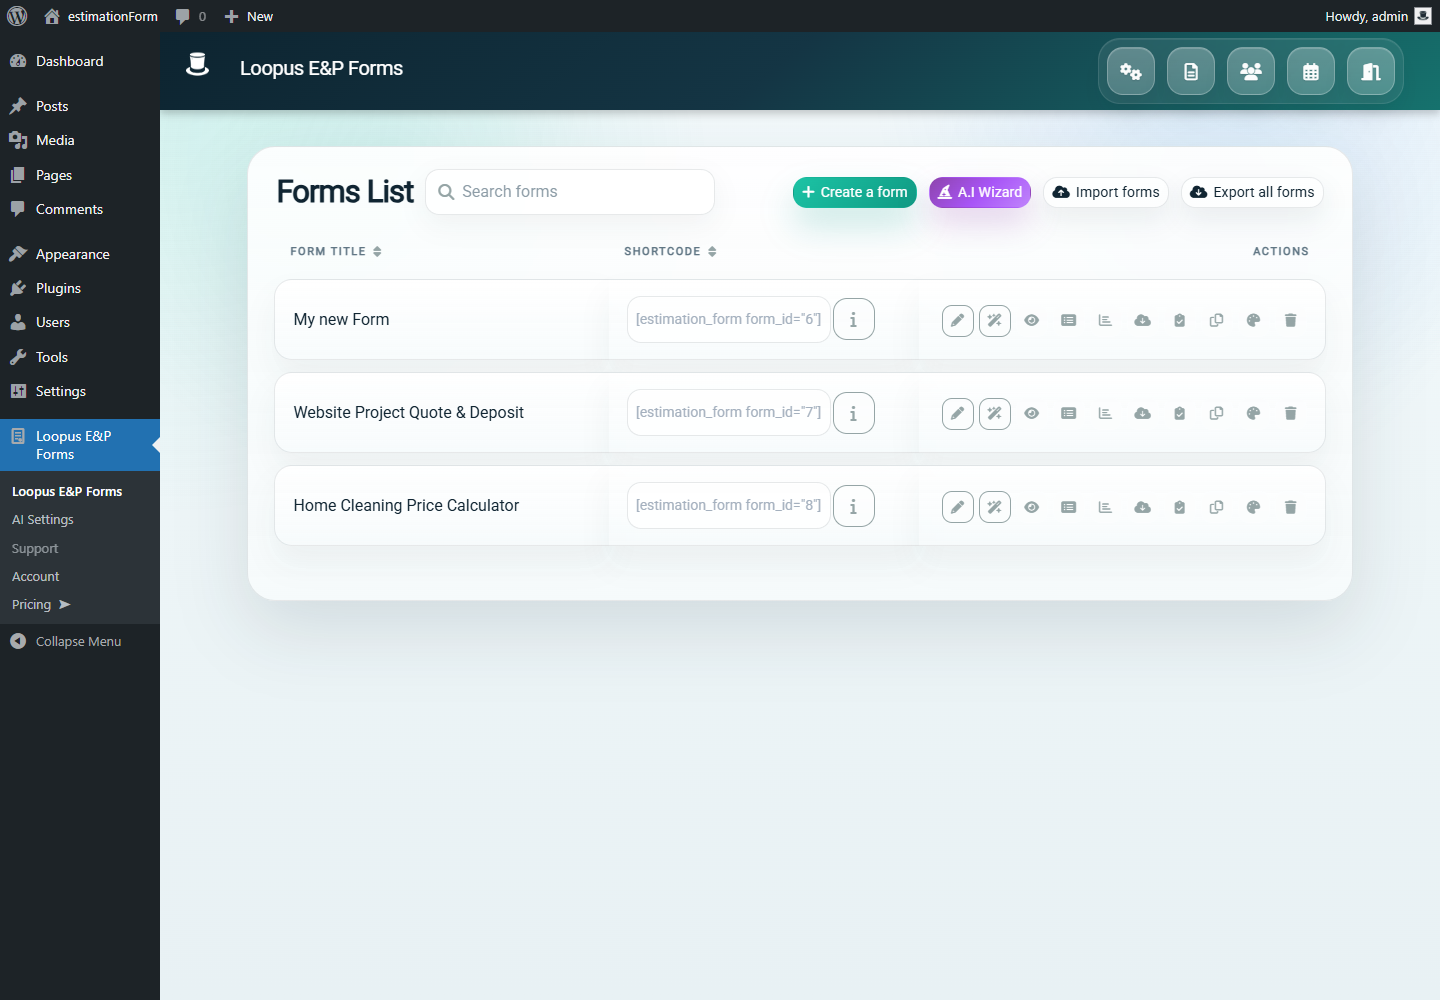
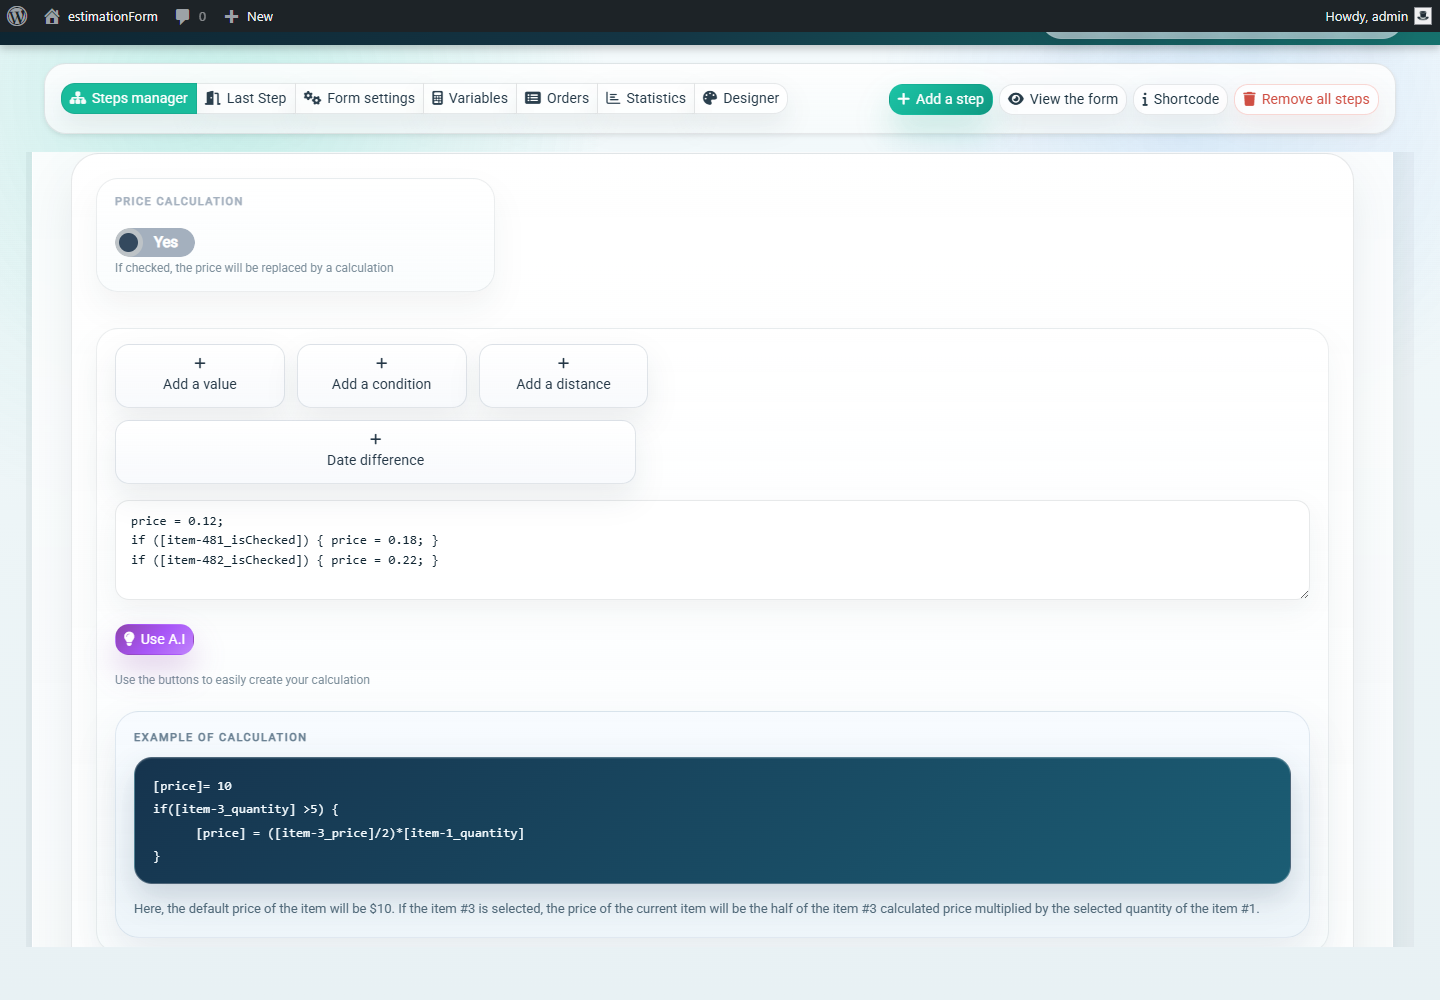
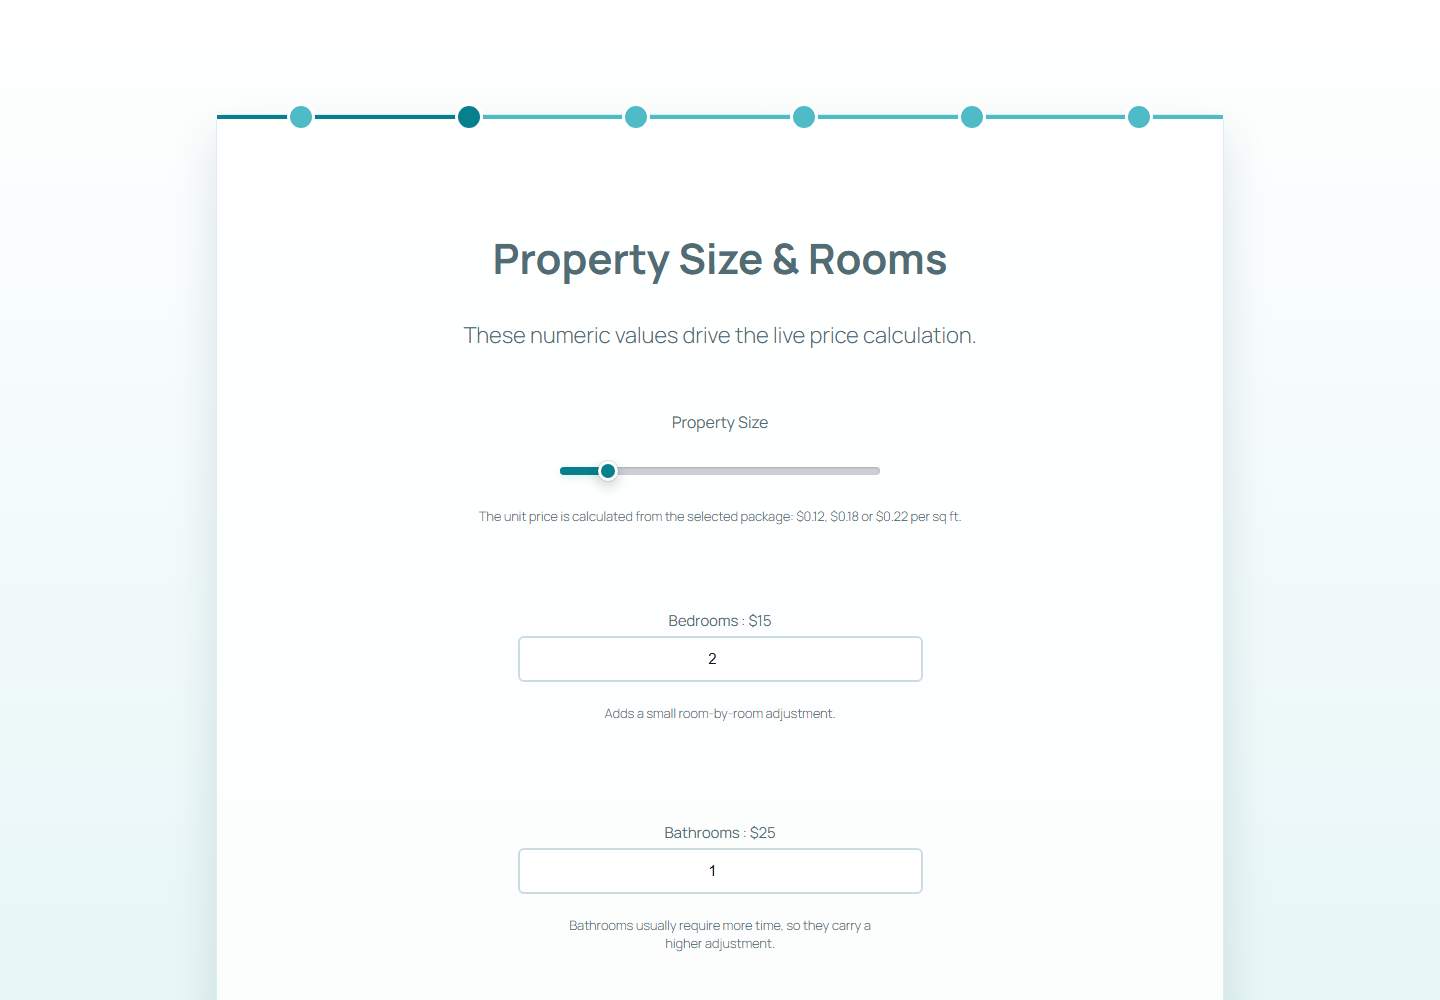
Start from the plugin forms screen and open the AI wizard. Describe the business, the pricing variables, the expected steps, and the fact that the Property Size item will use a Price calculation formula.

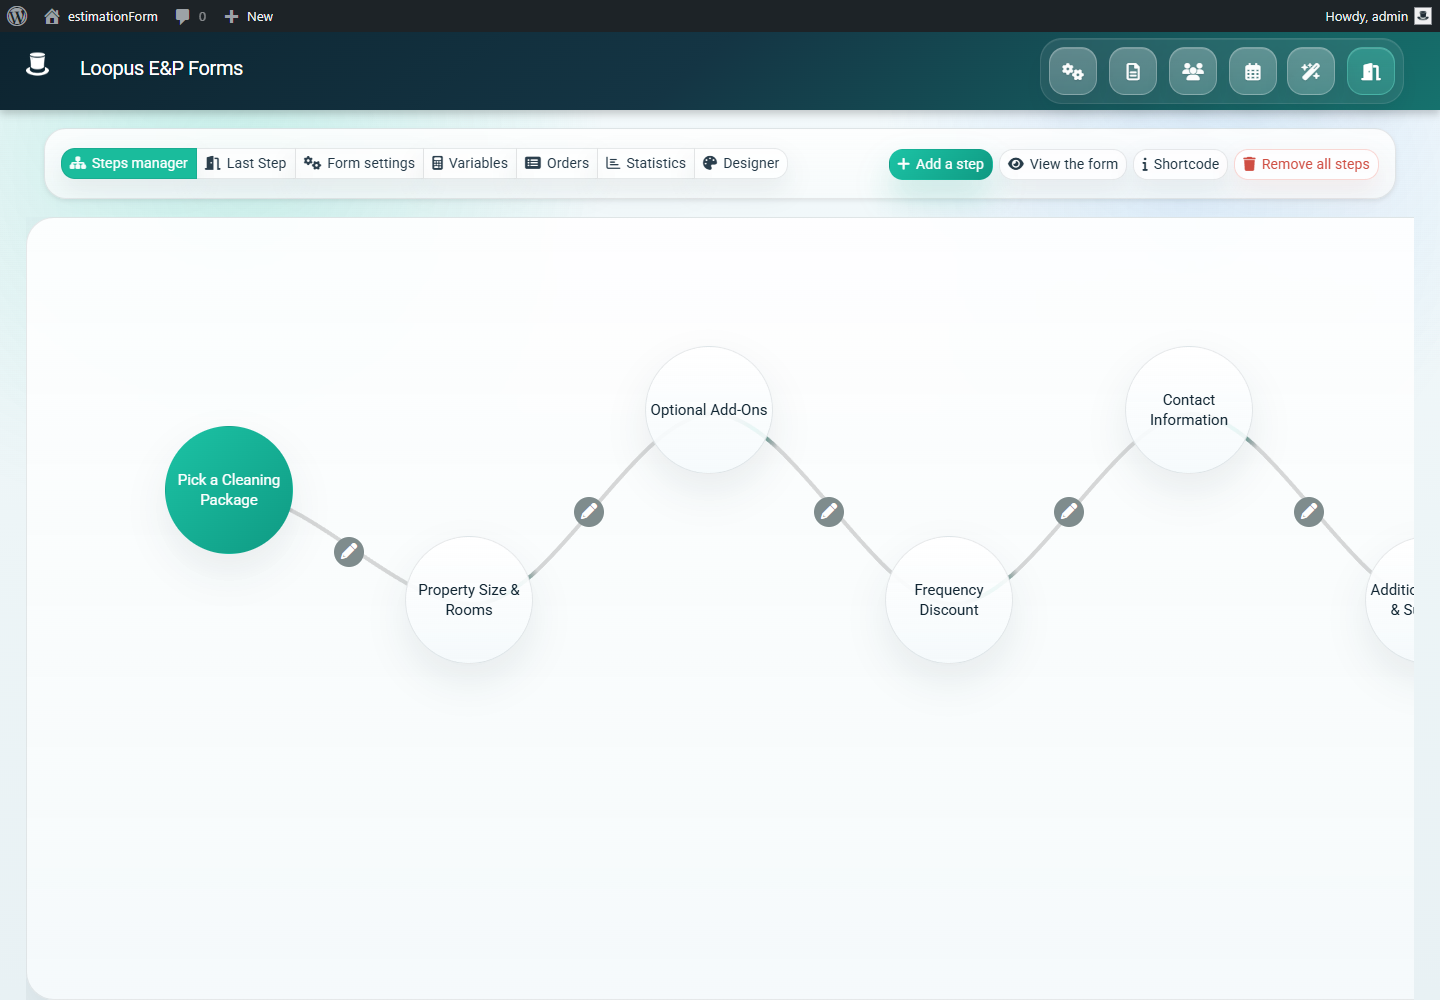
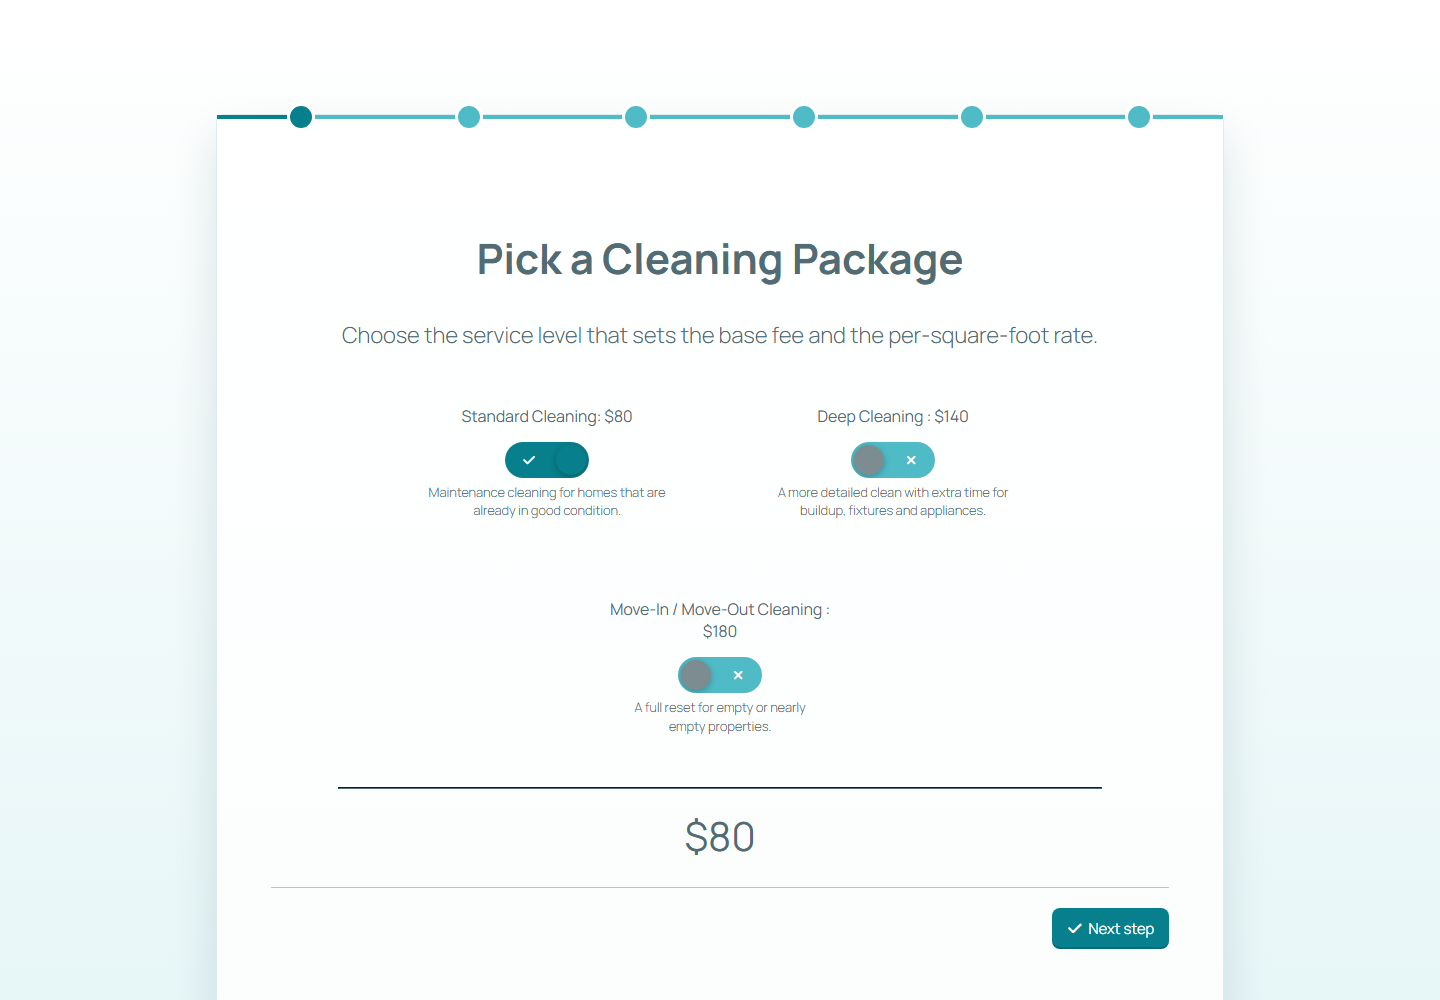
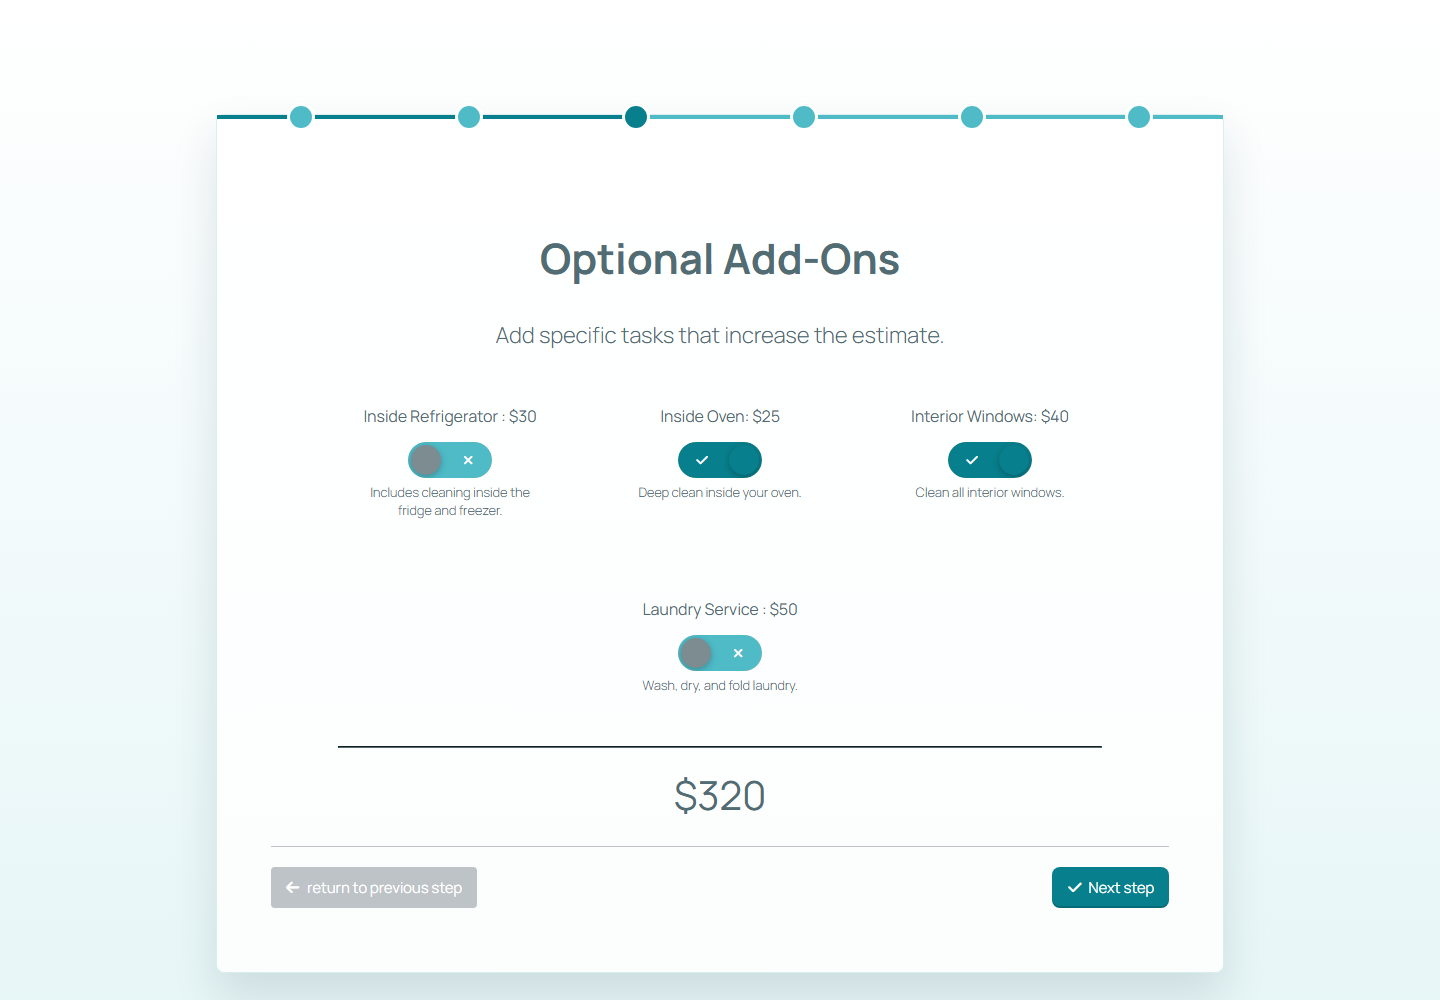
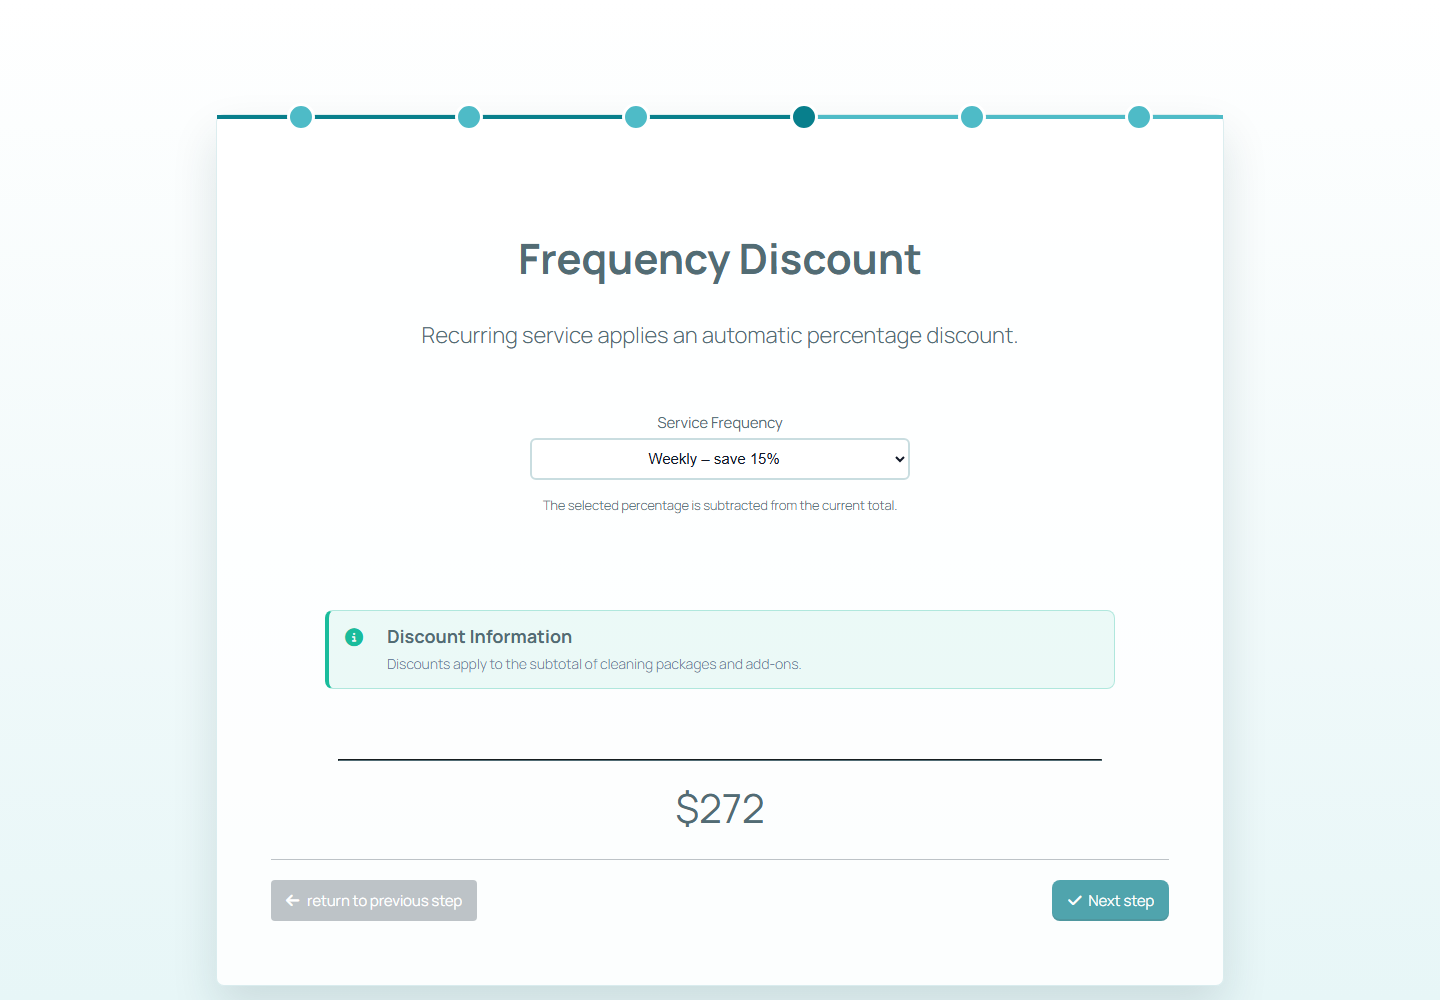
For this guide, the prompt asks for a cleaning service calculator with package choice, property size, number of rooms, add-ons, frequency discounts, and a final summary.

  • Ask for a multi-step form instead of one crowded screen.
  • Name the variables that change the price.
  • Mention the Price calculation formula explicitly so the form logic has a clear calculation point.
AI wizard prompt for creating a WordPress price calculation form
The AI wizard prompt defines the pricing variables before the form is generated.

Step 2

Confirm the generated form exists in the admin

After generation, return to the forms list and check that the calculator has a clear name. A descriptive name makes it easier to manage test forms, demos, and production calculators later.

In this example, the form is named Home Cleaning Price Calculator because the calculation model is tied to a cleaning service offer.

  • Use a readable form name.
  • Keep the test form separate from production forms.
  • Open the generated form before editing calculation rules.
WordPress admin forms list showing a price calculation form
The generated calculator form is saved in the forms list and ready to edit.

Step 3

Review the step structure before editing formulas

A good price calculation form should follow the way a buyer thinks. Start with the service package, then ask for variables that affect price, then show options, discount choices, contact fields, and a final summary.

This order keeps the calculation understandable because the visitor sees each pricing decision before the final estimate.

  • Package choice comes first.
  • Property size and rooms define the main subtotal.
  • Add-ons and discounts come after the base estimate.
  • The final summary appears after all pricing choices.
WordPress form builder showing price calculator steps
The backend step list should match the customer journey on the frontend.

Step 4

Enable Price calculation on the pricing item

Open the item that should calculate the variable price, then open its Price tab and enable Price calculation. In this example, the Property Size slider uses a calculation formula to change the square-foot rate depending on the selected cleaning package.

The formula starts with the standard rate, then raises the rate when deep cleaning or move-in and move-out cleaning is selected. This is easier to maintain than creating duplicate fields for every package.

Use the Add a value and Add a condition controls beside the formula editor when referencing other fields. That way, the builder inserts the correct item references instead of forcing you to type item IDs from memory.

price = 0.12;
if ([item-481_isChecked]) { price = 0.18; }
if ([item-482_isChecked]) { price = 0.22; }
  • Build the formula from the item editor after enabling Price calculation.
  • Use Add a value and Add a condition to insert item references.
  • Keep the formula focused on one pricing decision.
  • Use readable package names so the logic is easy to audit.
  • Test the default package first, then test each package variation.
  • Document why each rate exists before handing the form to a client.
Price calculation settings in the WordPress form builder
The Price calculation switch replaces the item price with a formula written in the item editor.

Step 5

Embed the calculator fullscreen

Create a WordPress page for the calculator and embed the form with the fullscreen attribute. This keeps the pricing flow focused and avoids distractions from the surrounding theme layout.

Use the form ID from the forms list. The example shortcode below uses the local demo form created for this guide.

[estimation_form form_id="8" fullscreen="true"]
  • Use the correct form ID.
  • Publish one dedicated URL for the calculator.
  • Test the page as a normal visitor, not only inside the admin.

Step 6

Test the package selection step

Open the public page and start the form as a visitor. The first step should make the offer easy to understand and set the base price for the estimate.

For the cleaning calculator, Standard Cleaning starts at $80. Deep cleaning and move-in or move-out cleaning can use different base prices and different square-foot rates.

  • Check that one package is selected by default if that matches your sales flow.
  • Confirm the visible total starts at the expected amount.
  • Keep package labels clear enough for non-technical visitors.
Frontend package selection step in a WordPress price calculator
The first frontend step sets the base package and starting total.

Step 7

Verify the property-size calculation

Move to the property details step and check that the square-foot price, bedroom quantity, and bathroom quantity produce a sensible subtotal.

In this example, the property size is set to 1,000 square feet. With the standard rate, that adds $120 before room and bathroom quantities are included.

  • Test the default square-foot value.
  • Move the slider and confirm the total updates.
  • Check number fields that use quantity-based pricing.
Frontend property size price calculation step
The calculator updates the total from property size and room quantities.

Step 8

Add optional services to the estimate

Optional services are useful when the buyer may need extras but should not be forced into a larger package. Add-ons also make the final summary more specific for the business receiving the request.

The demo selects Inside Oven and Interior Windows. The total rises from $255 to $320 before the recurring-service discount is applied.

  • Use add-ons for clear, optional tasks.
  • Show prices beside each option.
  • Check that selected add-ons appear in the final summary.
Optional add-ons selected in a WordPress price calculator
Selected add-ons should visibly increase the live estimate.

Step 9

Apply a frequency discount

Recurring services often deserve a discount because the business can schedule them more efficiently. A select field can apply a percentage reduction after the subtotal is built.

Here, Weekly service applies a 15% reduction. The estimate drops from $320 to $272, and the summary later records the selected discount.

  • Use discount labels that explain the saving.
  • Confirm the discount is applied after add-ons.
  • Make the discount visible in the summary table.
Frequency discount step in a WordPress price calculation form
The frequency field applies a recurring-service discount to the current total.

Step 10

Collect final details before the summary

Before the final estimate, collect only the details that help the business respond: special requests, preferred date, files, or notes. Do not bury the pricing logic under too many non-pricing questions.

A short note explaining the calculation can also reduce confusion for users and clients who review the form later.

  • Keep non-pricing fields short.
  • Use upload fields only when photos or documents are genuinely useful.
  • Add a calculation note when the formula needs context.
Additional details step before the final price summary
The final details step keeps the estimate useful without hiding the total.

Step 11

Review the final price calculation summary

The final summary is where the calculator earns trust. It should show the selected package, calculated quantities, add-ons, discount, contact details, and final total in a way the customer and business can both understand.

In the demo, the final total is $272 after package price, property size, bedroom and bathroom quantities, selected add-ons, and the weekly discount.

  • Confirm the total matches the previous step.
  • Check that selected add-ons are listed.
  • Verify discounts appear as reductions.
  • Test the summary on desktop and mobile before publishing.
Final summary of a WordPress price calculation form
The final summary turns the calculation into a clear quote-ready record.

Launch checklist

  • Test every package and confirm the square-foot rate changes correctly.
  • Check quantity fields, add-ons, discounts, and final summary rows.
  • Review labels so visitors understand why the price changes.
  • Embed the calculator with fullscreen="true" on a dedicated page.
  • Run a mobile test before using the calculator on a production site.
Price calculation FAQ

Frequently asked questions

What is a WordPress price calculation form?

It is a form that calculates an estimated price from visitor choices such as packages, quantities, sliders, add-ons, formulas, and discounts.

Can I create price calculations without coding?

Yes. The builder handles many pricing rules through form items and settings. More advanced logic can use calculation formulas inside the form builder.

Can the AI wizard create the whole calculator automatically?

The AI wizard can create a strong first draft, but you should still review the steps, formulas, labels, prices, and final summary before publishing.

Can I use this for cleaning, moving, landscaping, or consulting?

Yes. The same structure works for service businesses where the final price depends on package choice, scope, quantities, extras, and discounts.

Can I add payments later?

Yes. After the calculation logic is correct, you can add a payment step such as Stripe, PayPal, WooCommerce, or another supported workflow depending on your setup.

Build a calculator that matches your pricing model

Use this workflow as a base for cleaning, moving, landscaping, consulting, maintenance, or any service where the final quote depends on packages, quantities, options, and discounts.